GCP Overview

The GCP services supported by cloudy are maintained as separate modules, which keeps development and maintenance simple. There is a consistent pattern to importing and working with these services.
from cloudy.google import {service}
But much of the power of GCP comes from chaining these services together into integrated pipelines to manage complex, cloud-based workflows. As a result, there are a set of classes and functions that are designed to work across services.
See the documentation for each of the services in the table of contents on the left, which includes code documentation for each class and function.
General Services
The configs.GoogleCloudConfig() class is used by most service modules. You use this class to set the project name, ID, region, and service account. This sets the level of access to different services, and ensures that the right permissions are granted before running jobs.
Cloud Storage can be used in many applications and contexts, and is one of the most general services with the fewest dependencies. If you need to access data, you'll work with the Storage API.
Cloud Logging provides error tracking and debugging support across different cloud contexts, including Compute Engine instances and Cloud Run applications. If something runs on a GCP service, it can be probably be logged.
Secrets Manager also supports multi-platform deployment, and is mostly used for setting and tracking private keys and environment variables.
Services with Dependencies
Cloud Tasks, Cloud Run, and PubSub typically have dependencies on other services, incuding each other. Cloud Tasks manages a queue of commands to execute via Cloud Run, which will log and report the status of the job queue, for example.
Cloud Run services are typically built in Docker containers, and we write code to accept HTTP requests that define the operations to perform. These operations could interface with Cloud Storage to pull data, process the data, and push the results to a new Cloud Storage location. The parameters passed to Cloud Run, like which datasets to process, can be submitted via a Cloud Task.
We won't get into detail here regarding how to set up a Cloud Run service - these services will be managed and developed on a project-by-project basis. But below is an example workflow for how you would set up a series of Cloud Tasks and submit them to Cloud Run using the cloudy workflow.
Chaining GCP Services
In the following example - which doesn't exist and uses fake credentials, so don't try and copy/paste it - we'll step through a workflow for submitting a set of Cloud Tasks that submit Cloud Run operations to convert rasters to cloud-optimized geotiffs.
import os
import json

from cloudy.google import configs, run, storage, tasks

# set up the authentication configuration
service_config = configs.GoogleCloudConfig(
    project_name = 'salo-planetary-computer',
    project_id = 'long-string-123456',
    project_region = 'us-west2',
    service_account_name = 'cloud-run-bot',
)

# get a list of files to process based on a consistent prefix
input_tiles = storage.list_cloud_storage_blobs_recursively(
    bucket_name = 'salo-rasters',
    bucket_key_prefix = 'california/tiles/sentinel-2-'
)

# construct a list of matching output tiles to store the processed data
output_tiles = [os.path.splitext(input_tile)[0] + '-cog.tif' for input_tile in input_tiles]

# get the cloud run endpoint to submit tasks to.
#  this must be a Cloud Run service in the same project as the config.
#  these can be created and managed via the Cloud Run GUI, or via CLI
cloud_run_endpoint = get_cloud_run_http_endpoint(
    service_name = 'cogify-service',
    google_config = service_config,
)

# create a list of tasks to submit
cloud_tasks = []
for input_tile, output_tile in zip(input_tiles, output_tiles):

    # the input arguments/parameters are defined by the cloud run
    #  service, and this example just takes simple input/output args
    task_parameters = {
        'input_path': input_tile,
        'output_path': output_tile,
    }

    # convert the parameters to a string to pass as the task body
    formatted_parameters = json.dumps(task_parameters)

    cloud_task = tasks.Task(
        task_body: formatted_parameters,
        task_name: input_tile, # use the tile name as the unique job id
        queue: 'cogify-queue',
        http_endpoint: cloud_run_endpoint,
        google_config: service_config,
    )

    cloud_tasks.append(cloud_task)

# submit the tasks to the Cloud Run queue
tasks.publish_tasks_to_queue(cloud_tasks, assert_success=True)
Support Scripts
In addition to the cloudy package, this repo contains a series of compute_engine helper scripts. These can be found here:
salo-cloud-services/scripts/google/compute_engine/
Each script contains a series of bash commands for running common GCP operations from the command line. There are examples for setting up Compute Engine instances, logging in via SSH, and shutting them down.
This repository also includes a set of service_accounts scripts. There is currently only one shell script, which is used to create a new service account under an existing project.
Command Line Helpers
We've created and packaged a series of command line shortcuts for simplifying gcloud calls. This is designed to be added to your .bashrc file to load as you start your shell. Some examples include:
gprojects            # shortcut for: gcloud config get-value project
set_region us-west2  # shortcut for: gcloud config set compute/region us-west2
gssh salo-api-server # shortcut for: gcloud compute ssh salo-api-server
To use these shortcuts, append the following line to either .bashrc or .bash_profile:
source $HOME/src/salo-cloud-services/scripts/google/gcp-shortcuts.sh
You'll probably have to update the path to the location of the repository on your local machine.
Developer Cheat Sheet
There are so many dang GCP services that it's hard to keep track of them all. Below is a cheat sheet with four-word descriptions of each service.
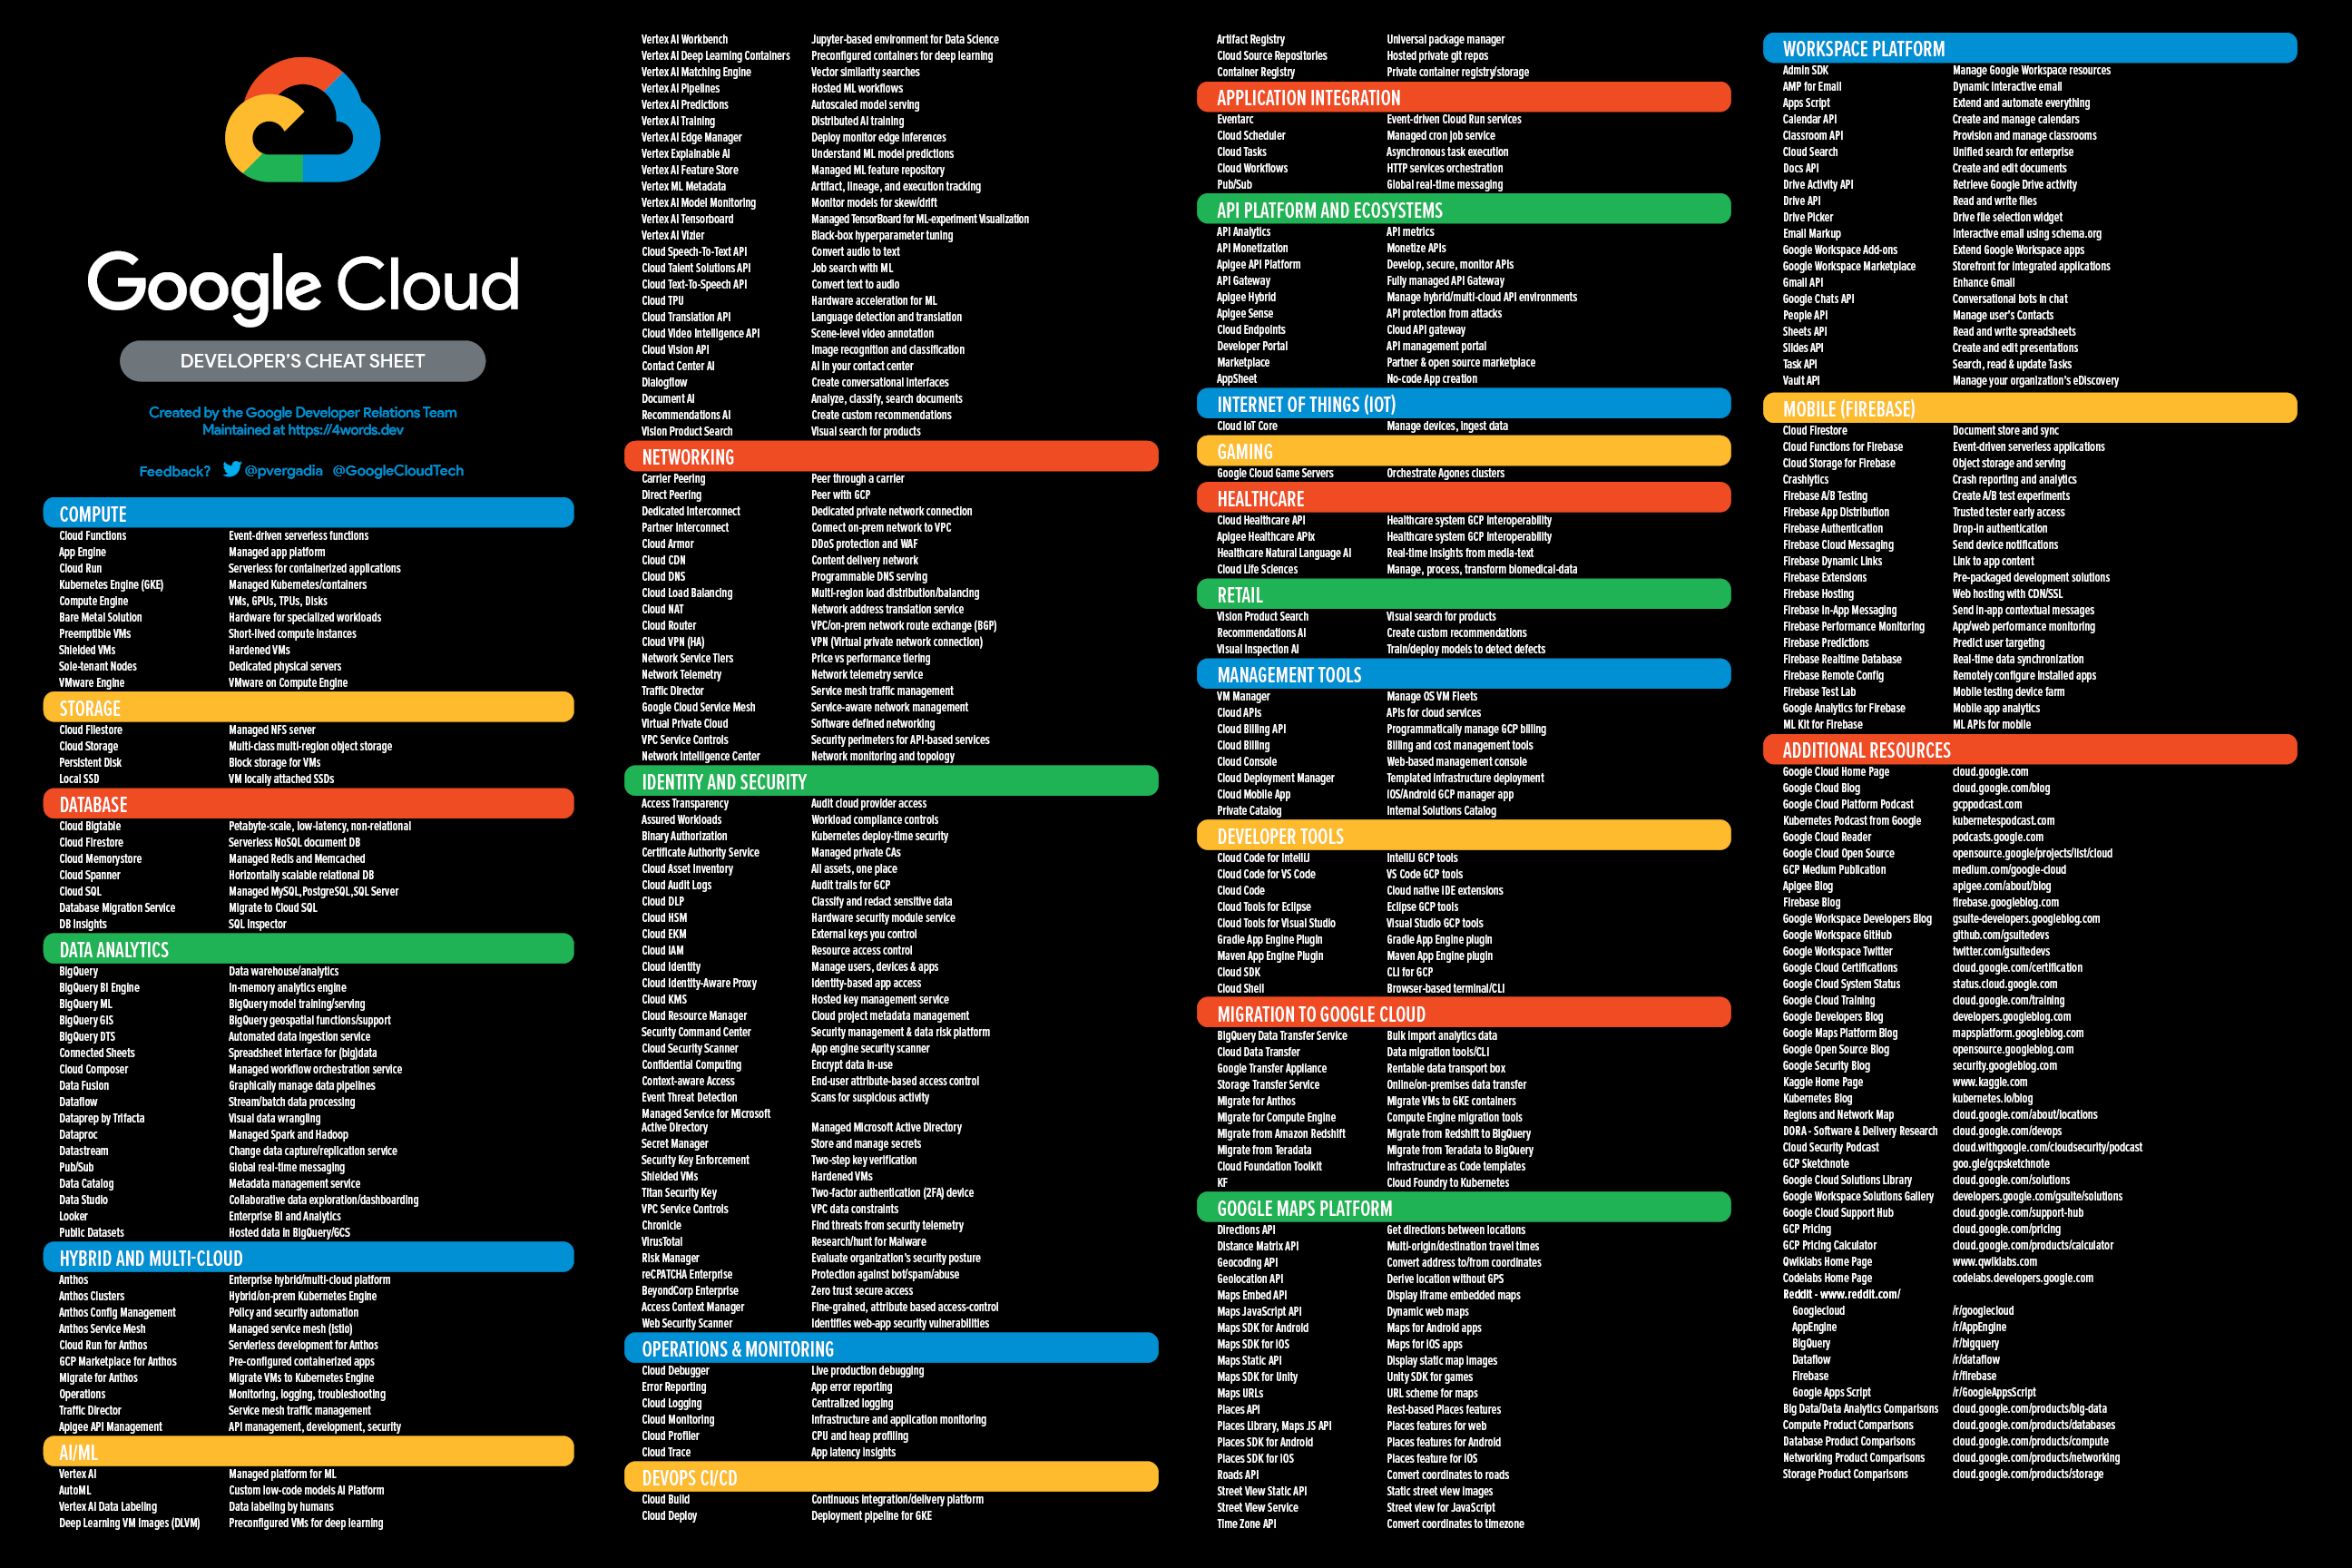
Right click and open in a new tab to view the full-size image.